Ducati 899 Panigale Forum banner

Cracked dash display

623 views 3 replies 2 participants last post by  120CCPM  
#1 ·
The dash on my 899 started showing cracks a few years ago (3 cracks to be exact), but considering the cost of a new dash, I decided to live with it.

Fast forward to today, I now have around 10 cracks that suddenly popped up with no explanation. I’m assuming some combination of plastic fatigue and thermal expansion might be the cause. Nevertheless, I’ve ordered a replacement cover off eBay. To replace this it will require the display to be removed and the outer casing to be separated before the new cover can be installed and sealed. Stay tuned for a write up soon, I should have the new cover in hand by next week.
Image
 
#2 · (Edited)
I was finally able to get this job done. Here's what I learned:

1) When disassembling the front end, take lots of photos so that you remember how to route the wires, particularly the mirrors.
2) Fairing removal takes more time than fixing the dash

Step 1: Remove both side fairings, mirrors, front nose, etc

Step 2: Once you've gotten to the dash itself, the dash is held on by 3 8mm nuts, these are easy to remove

Step 3: Now that you have the dash in hand, familiarize yourself with the layout. The black bezel is what you are going to cut (I used a dremel with a plastic cutting wheel going at a very slow speed). Using a slow speed on the dremel, you can slowly work your way around the seam of the dash. As soon as you see white plastic, stop cutting and move to another section. In reality, you dont need to fully cut the plastic all the way through the whole way around. Its pretty brittle and I was able to snap it free with a flat head screw driver because I was paranoid every time I saw white. But, it looks like the white plastic has a good buffer before you get to anything vital, so even if you nick it with your cutting wheel it should be fine. Picture below for reference about how far in youll need to cut.

Note: I did try a hair drier and some tools to pry the top off. I've seen reports that others were able to get theirs out. But after trying this for 2 hours, I gave up and just cut it with the dremel.
Image

Image

Image


Step 4: Once you've removed the top half, you'll be able to see the actual display. The surround is just lightly glued on and i was able to use a spudger from a cell phone repair kit to gently lift it off
Image


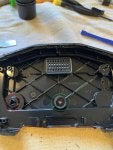
Step 5: This is where it gets a little tricky. The electronics are held in by 5 T6 screws (locations in red), and some glue (in green). The issue is, the glue around the edges is left over from the sealing process. You can slowly work this apart. However, there is also a big dab of glue underneath that you'll need to get at. Otherwise if you just try pulling, the whole circuit board starts to bend. So what I did was cut a small window in the lower half of the black plastic so I could get at the glue from underneath. WARNING: There is a ribbon cable near the bottom center, so if you go too deep you might ruin the dash. In the photo below I pulled the white part away from the circuit board by releasing the two clips (right above the screw holes on the bottom side of the dash. You dont need to do this. I only did this because I was trying to figure out why I couldnt pull the electronics out, I figured there was a screw underneath but I was wrong, only glue.
Image


To be continued in next post....
 

Attachments

#3 ·
Step 6: To remove the remaining glue holding the circuit board down, I used the previously mentioned window that I cut and used a very small and thin flat head screwdriver to chip away at the glue. Lifting up the board caused the glue to stretch just enough so that I could essentially slice away at it with the screwdriver while not damaging the circuit board.

Step 7: Once you have the electronics removed, you can breathe a sigh of relief... the hard part is done. But before you drop the electronics into the new casing, you'll need to make a small modification to the new unit. On the backside of the old dash case, there is a small breather. Im assuming this has to do with allowing moisture to escape and allowing for pressure equalization. Who knows... but it seemed important to have. My new casing didnt have a hole for this but it did have a little mesh in the lower corner at the same spot. So, I went ahead and drilled a hole that was the same size as the opening on the old dash. The little breather just pops out and in. However, I did not anticipate that the old casing has a recessed circle for the breather to nicely seat into. The new case is just flat. To keep it from wiggling around, I just added some sealant to the breather to help keep it secure. Second picture for reference.
Image

Image


Step 8: Now that you've installed and secured the breather, you can now put your electronics into the new case. There were some small differences in my new case compared to the original, but all the screw holes line up perfectly. Reinstall the 5 T6 screws that you removed previously. Make sure to give your LCD a quick wipe with a microfiber because You'll certainly have some plastic dust all over it by now.

Step 9: Reinstall the cut outs for the LEDs, the glue should still be plenty sticky

Step 10: To seal the unit, I used a small bead of Sikaflex (I got mine from West Marine). Once you've put a small but consistent amount of sealer around the case, you can now put the top piece on. You'll probably want to give it a quick wipe before you do so that its clean. My unit had some odd defects in the clear plastic... its definitely not top shelf clarity but its way better than having cracks. With the top now installed, wrap a few rubber bands around it so it stays together. Mine would slowly push itself out about 1/16'', so I let the rubber bands stay on over night until it cured.
Image


Step 11: The last small issue i noticed were the rubber isolators on the back did not fully seat like they did on the original, in the photo below you can see how there is a small gap. To solve this, I went to the hardware store and bought some small, 1/16'' thick neoprene washers to fill the gap. I don't know if this is totally necessary, but for $1.50, It gave me peace of mind so it was worth it.
Image


Step 12: After this is all done and your sealer has cured, remove the rubber bands and buff the whole thing to a nice shine. The sikaflex left some residue all over but it came off pretty easy.

Step 13: Reinstall on the bike and pat yourself on the back.

Good luck yall!
 

Attachments